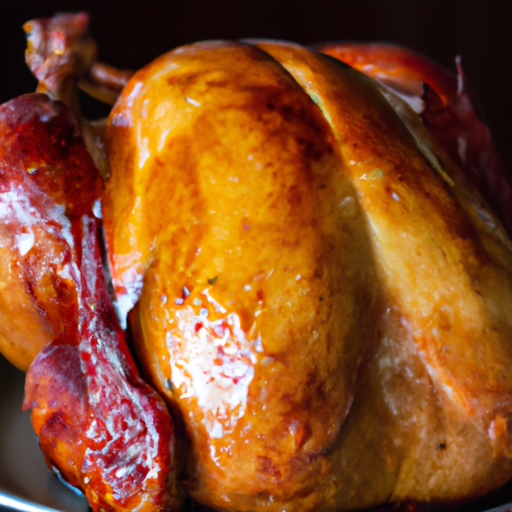
Imagine effortlessly serving the perfect turkey this Thanksgiving, with tender and flavorful meat that leaves your guests amazed. Introducing the “Perfectly Cooked Brined Turkey,” a culinary masterpiece that takes the stress out of holiday cooking. With precise cooking times for brined turkey, this product guarantees juicy and succulent meat every time. Say goodbye to overcooked or undercooked turkeys, and say hello to a stress-free holiday feast that will have everyone coming back for seconds.

Preparing the Brine
Gathering the ingredients
Before you can begin brining your turkey, it’s important to gather all the necessary ingredients. For a basic brine solution, you will need water, salt, and sugar. However, you can take your brine to the next level by adding various spices and herbs to enhance the flavor. Common ingredients include bay leaves, whole peppercorns, garlic cloves, and fresh herbs such as thyme, rosemary, and sage. Be sure to have all your ingredients measured and ready to go before you start preparing the brine.
Choosing the right turkey
When it comes to choosing a turkey for brining, it’s important to select a fresh, high-quality bird. Look for a turkey that is plump, with smooth and moist skin. If possible, opt for an organic or free-range turkey for the best flavor and texture. Consider the size of your turkey based on the number of guests you will be serving and the cooking method you plan to use. Whether you choose a small, medium, or large turkey, the brining process will help ensure that it cooks evenly and stays moist.
Calculating the brining time
The duration of the brining process depends on the size of your turkey. As a general rule, you will need to brine your turkey for about 1 hour per pound. For example, a 12-pound turkey would need to be brined for approximately 12 hours. It’s important to factor in this extra time when planning your Thanksgiving or holiday meal. Keep in mind that brining for longer than the recommended time can result in an overly salted turkey, so be mindful of the brining duration.
Mixing the brine solution
Once you have gathered your ingredients and determined the brining time, it’s time to mix the brine solution. Start by boiling a portion of the water and adding the salt and sugar, stirring until they are fully dissolved. Then, add the remaining cold water to cool down the brine. At this point, you can also add any additional spices or herbs to infuse more flavor into the brine. Allow the brine solution to cool completely before proceeding to the next step.
Brining the Turkey
Choosing the brining container
When it comes to brining your turkey, choosing the right container is crucial. You will need a container that is large enough to fully submerge the turkey in the brine solution. A food-grade plastic bucket or a clean, non-reactive container such as a stainless steel or ceramic vessel works well for brining. Make sure the container is deep enough to fully immerse the turkey and that it fits in your refrigerator comfortably.
Submerging the turkey in brine
Once you have your container ready, carefully place the turkey in the brining solution. Ensure that the turkey is fully submerged, with the brine covering the entire bird. This will ensure that the flavors penetrate the meat evenly. It is recommended to weigh down the turkey with a plate or other heavy object to keep it fully immersed. This prevents the turkey from floating or becoming partially exposed to the air, which can affect the brining process.
Refrigerating the turkey
After submerging the turkey in the brine, it’s essential to refrigerate it properly. Place the container with the turkey in the refrigerator, making sure it is on a stable surface. The brining process requires the turkey to be kept at a consistent temperature of 40°F (4°C) or below. This ensures food safety and maximizes the effectiveness of the brine. Remember to clear enough space in your refrigerator to accommodate the size of your turkey.
Brining duration
The duration of brining varies depending on the size of the turkey, as mentioned earlier. Once you have calculated the required brining time, leave the turkey in the brine for the specified number of hours, making sure it is not left in the brine for too long. Over-brining can result in a turkey that is overly salty and may affect the texture. Stick to the recommended brining time to achieve the perfect balance of flavor, moisture, and tenderness.
Preparing the Turkey for Cooking
Removing the turkey from brine
After the brining process is complete, carefully remove the turkey from the brine solution. Be mindful of any excess liquid that may drip off the turkey, ensuring it doesn’t come into contact with any other food surfaces. To facilitate this step, you can place the turkey on a clean cutting board or a rimmed baking sheet lined with paper towels.
Rinsing the turkey
Once the turkey is out of the brine, it’s a best practice to rinse it thoroughly under cold running water. This step helps remove any excess salt or sugar from the brine that may have adhered to the surface of the turkey. Gently pat the turkey dry with paper towels after rinsing, ensuring you don’t remove any of the brining flavors or moisture. Take care not to rinse the turkey too vigorously, as this can lead to a loss of the infused flavors.
Patting the turkey dry
To ensure a crisp and golden skin, it’s essential to pat the turkey dry thoroughly before cooking. Use clean paper towels to gently blot the surface of the turkey, absorbing any moisture from the rinsing process. Pay special attention to the cavity and crevices, ensuring they are also dry. A dry turkey surface helps promote better browning during the cooking process, resulting in an appealing presentation and delicious flavor.
Seasoning the turkey
Once the turkey is dry, it’s time to season it to enhance the flavors even further. Seasoning can be as simple as rubbing the turkey with a combination of salt, pepper, and herbs. You can also insert chopped herbs, garlic, or even citrus slices into the cavity of the turkey for added aroma and flavor. Take your time to ensure that the seasoning is evenly distributed and adheres well to the turkey. Now, your brined turkey is ready to be cooked using your preferred method!

Cooking Techniques
Roasting the turkey
Roasting a turkey is a classic and popular cooking method that yields a beautifully browned bird with tender meat. To roast a brined turkey, preheat your oven to the appropriate temperature according to the size of your turkey. Place the turkey on a roasting rack in a shallow roasting pan, breast-side up. Baste the turkey with some melted butter or olive oil for added moisture and flavor. Roast the turkey, following a cooking time chart based on the weight of the turkey, until the internal temperature reaches the recommended safe minimum temperature.
Grilling the turkey
Grilling a turkey can be an exciting and flavorful way to cook your brined bird. Start by preheating your grill to medium-high heat and preparing it for indirect grilling. Place a drip pan filled with water under the grates to catch any drippings and prevent flare-ups. Place the turkey on the grill grates, breast-side up, away from direct heat. Grill the turkey with the lid closed, occasionally basting it with your preferred marinade or sauce. Cook the turkey until the internal temperature reaches the recommended safe minimum temperature.
Smoking the turkey
Smoking a turkey imparts a delicious smoky flavor that complements the brining process perfectly. Set up your smoker according to the manufacturer’s instructions and preheat it to a temperature of around 225°F (107°C). Use hardwood chips or chunks, such as hickory or applewood, to generate the desired smoke. Place the turkey on the smoker rack, breast-side up, and close the smoker’s lid. Maintain a steady smoking temperature and periodically replenish the wood chips or chunks. Smoke the turkey until the internal temperature reaches the recommended safe minimum temperature.
Deep-frying the turkey
Deep-frying a turkey produces a succulent and incredibly crispy skin that is sure to delight your taste buds. To deep-fry a brined turkey, it’s essential to follow safety precautions and use a dedicated turkey fryer or a large pot specifically designed for deep-frying. Fill the fryer or pot with enough oil to fully submerge the turkey, making sure to leave at least a 5-inch (13 cm) space from the top of the vessel. Preheat the oil to the recommended temperature and carefully lower the turkey into the oil using a turkey lifter or hooks. Fry the turkey for the specified time based on its weight, ensuring that the internal temperature reaches the recommended safe minimum temperature.
Using a Meat Thermometer
Choosing a reliable meat thermometer
A reliable meat thermometer is an indispensable tool for ensuring your turkey is properly cooked and safe to consume. Choose a digital or instant-read meat thermometer that is accurate and easy to use. Look for a model with a long probe that can reach the deepest part of the turkey without touching bone, as this can affect the accuracy of the reading.
Inserting the meat thermometer
When it’s time to check the internal temperature of your turkey, insert the meat thermometer into the thickest part of the thigh, avoiding contact with bone. The thigh is the slowest part of the turkey to cook and should be at a higher temperature than the breast for optimal doneness. Ensure that the thermometer is securely inserted but not touching the bone, as this can give an inaccurate reading.
Monitoring the internal temperature
Throughout the cooking process, it’s important to monitor the internal temperature of the turkey to ensure it reaches a safe minimum temperature. Check the thermometer readings periodically, especially as the turkey approaches the recommended cooking time. This will help you avoid overcooking or undercooking the turkey, resulting in a perfectly cooked and safe-to-eat bird.
Determining the doneness
The recommended safe minimum internal temperature for a fully cooked turkey is 165°F (74°C). Once the thermometer reaches this temperature in multiple spots, the turkey is considered safe to eat. Keep in mind that the turkey will continue to cook a little further as it rests, so it’s best to remove it from the heat source just before reaching the target temperature. This allows for residual heat to complete the cooking process and ensures optimal juiciness and tenderness.
Basting and Trussing the Turkey
Basting techniques
Basting is often seen as a traditional method to enhance the flavor and moisture of the turkey. While it can add richness and depth to the outer layer, it’s important to note that basting does not significantly penetrate the meat. To baste your turkey, use a basting brush or a spoon to drizzle pan drippings, melted butter, or your preferred basting sauce over the turkey periodically throughout the cooking process. This creates a beautifully caramelized and flavorful skin.
Trussing the turkey
Trussing involves tying the turkey’s legs and wings securely with kitchen twine to hold its shape during cooking. Trussing helps promote even cooking and can enhance presentation. To truss the turkey, begin by tucking the wings behind the back and tying them to the body with twine. Then, cross the legs and tie them together at the joint. Trussing can be optional, especially when using cooking methods like roasting or grilling, but it can add an extra touch of elegance to your finished turkey.
Benefits of basting and trussing
While basting and trussing are not necessary for a perfectly cooked brined turkey, they can provide additional benefits. Basting helps to keep the outer layer of the turkey moist and can add extra flavor. Trussing helps the turkey maintain its shape during cooking, resulting in a more visually appealing presentation. These techniques are particularly useful when roasting a turkey, but you can choose to skip them if you prefer a simpler approach.
Alternative methods
If basting and trussing don’t align with your cooking style or preferences, don’t worry! There are alternative methods to achieve a delicious result. For instance, you can brush the turkey with a flavorful marinade or glaze before and during the cooking process. This adds a burst of flavor without the need for frequent basting. Similarly, skipping the trussing step allows for a more relaxed cooking process and can give the turkey a beautifully rustic appearance.
Accompaniments and Side Dishes
Popular accompaniments
When serving a brined turkey, it’s essential to pair it with delicious accompaniments that complement its flavors. Classic side dishes such as mashed potatoes, green bean casserole, cranberry sauce, and dinner rolls are always crowd-pleasers. Consider incorporating a variety of textures and flavors into your accompaniments to create a well-rounded and satisfying Thanksgiving or holiday meal.
Stuffing or dressing options
Stuffing or dressing is a staple on many Thanksgiving tables and provides a hearty and flavorful addition to your meal. Whether you prefer traditional stuffing with breadcrumbs, herbs, and vegetables, or a more unique variation with cornbread, sausage, or dried fruits, there are endless possibilities to explore. Don’t forget to factor in your guests’ dietary restrictions or preferences when choosing the stuffing or dressing options.
Vegetable side dishes
When it comes to vegetable side dishes, it’s great to have a variety of options to cater to different tastes and dietary needs. Roasted root vegetables, sautéed green beans, glazed carrots, or a colorful vegetable medley can add a vibrant and nutritious touch to your meal. Consider incorporating seasonal vegetables to make the most of the flavors and to add a festive touch to your spread.
Gravy and sauces
Gravy serves as a finishing touch to your brined turkey and side dishes, adding richness and moisture to the meal. Save the flavorful drippings from your roasting pan or use the brine-infused juices to create a delicious homemade gravy. Alternatively, you can also experiment with different sauces or glazes to complement the flavors of your turkey. Whether it’s a classic turkey gravy, homemade cranberry sauce, or a tangy citrus glaze, sauces play a vital role in elevating your meal.
Resting and Carving
Resting the cooked turkey
Once your turkey is cooked to perfection, it’s important to allow it to rest before carving. Resting allows the juices to redistribute throughout the turkey, resulting in a more succulent and flavorful meat. Remove the turkey from the heat source and tent it loosely with aluminum foil. Let the turkey rest for at least 20–30 minutes, ensuring it stays warm. This gives you time to prepare the gravy, side dishes, and other elements of your meal.
Carving techniques
Carving a turkey can seem intimidating, but with a little practice, you’ll master the art of carving in no time. Start by removing the twine or any trussing you have used. Begin by slicing through the skin between the leg and the breast. Pull the leg away from the body until the joint pops, then continue cutting through the joint to detach the leg completely. Repeat the process with the other leg. For the breast, make long slices parallel to the breastbone, starting from the top and working your way down. Remember to use a sharp carving knife and a steady hand.
Serving guidelines
When it’s time to serve your brined turkey, present it in an appealing and organized manner. Arrange the carved meat on a platter, placing the dark meat and white meat separately. This allows guests to choose their preferred cut. You can also garnish the platter with fresh herbs or citrus slices for an elegant touch. Serve the turkey alongside your prepared side dishes, gravies, and sauces to create a visually pleasing and inviting Thanksgiving or holiday feast.
Leftover storage
If you have any leftovers after your wonderful meal, it’s important to store them properly to maintain their quality and safety. Allow the remaining turkey to cool completely before transferring it to airtight containers or zip-top bags. Refrigerate the leftovers promptly, ideally within 2 hours of cooking. Leftover turkey can be safely stored in the refrigerator for up to four days. Alternatively, you can freeze the leftovers in freezer-safe containers for up to three months. Label and date the containers to help with easy identification and use within a reasonable timeframe.
Troubleshooting
Dry turkey
If your turkey turns out dry, it could be due to overcooking or under-brining. To prevent a dry turkey, try reducing the cooking time slightly and consider brining the turkey for a longer duration next time. It’s also important to monitor the internal temperature carefully to avoid overcooking. Additionally, creating a flavorful gravy or serving the turkey with sauces can help add moisture and enhance the overall dining experience.
Salty turkey
If your turkey ends up being too salty, it’s likely due to over-brining or using a brine with an excessive salt-to-water ratio. Ensure that you follow the recommended brining time and the correct ratio of salt and water. If you find your turkey to be overly salty, you can try soaking it in cold water for a short period to help remove some of the excess salt. However, this should be done cautiously, as it may affect the flavors and texture of the turkey.
Unevenly cooked turkey
Uneven cooking can occur if the turkey is not trussed properly or if the oven temperature is not distributed evenly. To ensure even cooking, make sure to secure the legs and wings of the turkey tightly with twine. Consider investing in an oven thermometer to verify the accuracy of your oven’s temperature. Rotating the turkey during the cooking process can also help promote even browning and cooking throughout.
Safety concerns
When handling raw turkey, it’s essential to follow proper food safety practices to prevent foodborne illnesses. Thoroughly wash your hands before and after handling the turkey, as well as any utensils or surfaces that come into contact with raw poultry. Keep raw turkey separate from other foods to avoid cross-contamination. Cook the turkey to the recommended safe minimum internal temperature of 165°F (74°C) to ensure it is safe to eat. Refrigerate the turkey promptly after cooking and consume the leftovers within a safe timeframe.
Recommended Resources
Cookbooks on turkey preparation
- “The Perfect Turkey Cookbook: More Than 100 Mouthwatering Recipes” by Ann Marie Corinthios
- “The Heritage Turkey Cookbook: Recipes for a Thanksgiving Turkey Fest” by Catherine Lamb
- “How to Cook a Turkey: And All the Other Trimmings” by Julian Epstein
Online tutorials and videos
- The Food Network’s website features numerous turkey recipe ideas, cooking techniques, and tutorial videos.
- Epicurious offers a collection of turkey recipes, tips, and instructional videos from renowned chefs.
Useful websites and forums
- The Butterball website provides a wealth of information on turkey preparation, cooking techniques, and troubleshooting common issues.
- The Serious Eats website offers in-depth articles, recipes, and forums on turkey cooking methods, brining, and more.
Turkey cooking classes
Consider taking a cooking class or workshop focused on turkey preparation. Local culinary schools, community centers, or even specialty grocery stores often offer classes on holiday cooking or turkey-specific techniques. Attending a hands-on class can provide valuable insights, tips, and personalized guidance to help you perfect your brined turkey.