Imagine the mouthwatering aroma of a perfectly roasted chicken, its golden brown skin crispy and flavorful. With the “Perfectly Roasted Chicken” product, you can achieve this culinary delight in no time. Say goodbye to guesswork with the cooking times for chicken roast. This ultimate kitchen companion takes the stress out of preparing a delicious roast chicken, allowing you to savor every bite with confidence.

Selecting the chicken
When it comes to roasting a chicken, selecting the right one is the first step towards achieving a delicious and tender roast. Here are a few factors to consider when choosing your chicken.
Choosing the right size
The size of the chicken is an important consideration as it will affect the cooking time. A larger chicken will take longer to roast, while a smaller one will cook more quickly. If you’re cooking for a small group, a 3-4 pound chicken should be sufficient. However, if you’re feeding a larger crowd, you may want to opt for a 5-7 pound chicken.
Fresh vs. frozen
Fresh and frozen chicken both have their advantages. Fresh chicken tends to have a slightly better texture and flavor, but it often comes at a higher price point. On the other hand, frozen chicken is more readily available and can be kept in the freezer until you’re ready to use it. If you choose to go with frozen chicken, it’s important to thaw it properly before roasting.
Organic vs. conventionally-raised
Another consideration when selecting a chicken is whether to go for organic or conventionally-raised. Organic chickens are raised without the use of antibiotics or hormones and are fed organic feed. They are generally considered to be more ethically and sustainably produced. Conventionally-raised chickens, on the other hand, are raised using conventional farming methods. Ultimately, the choice between organic and conventionally-raised chicken comes down to your personal preferences and values.
Preparing the chicken
Once you have selected the perfect chicken, it’s time to prepare it for roasting. Proper preparation ensures that the chicken cooks evenly and results in a delicious and moist roast.
Thawing the frozen chicken
If you’re working with frozen chicken, it’s important to thaw it properly before roasting. The safest way to thaw a frozen chicken is in the refrigerator. Place the chicken in a tray or dish to catch any drips and leave it to thaw for 24-48 hours, depending on its size. Make sure to plan ahead and allow enough time for thawing, as a partially frozen chicken may not cook evenly.
Cleaning the chicken
Before getting started, give the chicken a good rinse under cold water to remove any unwanted debris. Pat it dry with paper towels to ensure a crispy skin once cooked. Remember to clean your sink and any utensils that come into contact with the raw chicken thoroughly to prevent cross-contamination.
Trimming excess fat
While some fat is essential for flavor and tenderness, excessive fat can result in a greasy and less appealing roast. Take a moment to trim any visible excess fat from the chicken before seasoning and roasting. This will help in achieving a leaner and healthier roast.
Brining the chicken (optional)
For an extra juicy and flavorful roast, consider brining the chicken before cooking. Brining involves soaking the chicken in a saltwater solution for a few hours. This helps to tenderize the meat and enhance the natural flavors. If you choose to brine, make sure to rinse the chicken thoroughly before seasoning and roasting.
Seasoning and flavoring
Seasoning and flavoring play a crucial role in turning an ordinary roasted chicken into something truly amazing. Here are a few techniques to enhance the taste of your chicken.
Classic herbs and spices
There’s nothing quite like the combination of classic herbs and spices to bring out the flavors in a roasted chicken. Some popular choices include rosemary, thyme, garlic, paprika, and black pepper. Create a dry rub by mixing these seasonings together and generously coat the chicken, ensuring that every nook and cranny is covered.
Marinades and rubs
Marinades and rubs are great for adding both flavor and moisture to the chicken. Whether you prefer a tangy citrus marinade or a savory spice rub, marinating the chicken for a few hours or overnight will infuse it with delicious flavors. Remember to discard any leftover marinade to avoid cross-contamination.
Infusing with aromatics
Aromatics such as onions, garlic, and herbs can be placed inside the chicken cavity to infuse it with even more flavor. The heat will cause these aromatics to release their natural oils, resulting in a chicken that is wonderfully fragrant and tasty. Be sure to remove the aromatics before carving and serving the chicken.
Enhancing with citrus
Citrus fruits, such as lemons or oranges, can add a refreshing twist to your roasted chicken. Squeeze the juice over the chicken before roasting or stuff the cavity with lemon or orange slices. The citrus flavors will permeate the meat, giving it a bright and tangy taste.

Achieving the perfect roast
Now that your chicken is seasoned and flavored to perfection, it’s time to focus on the roasting process itself. Here’s what you need to know to achieve a beautifully cooked roast.
Preheating the oven
Before placing the chicken in the oven, make sure to preheat it to the correct temperature. This ensures that the chicken starts cooking immediately and helps to achieve a crispy skin. Preheat the oven to 450°F (232°C) for a higher initial heat, which will aid in browning the skin.
Choosing the right roasting pan
A good quality roasting pan with a rack is essential for a successful roast. The rack elevates the chicken, allowing hot air to circulate around it for even cooking. A roasting pan with high sides also helps to catch any drippings, which can be used to make a flavorful gravy or sauce.
Tying the chicken (optional)
For a more uniform shape and even cooking, you may choose to tie the chicken before roasting. This is especially helpful if you have stuffed the cavity or if the chicken is irregularly shaped. Using kitchen twine, tie the legs together and secure the wings against the body. This will promote a more consistent roast.
Positioning the chicken in the pan
Place the chicken breast-side up on the rack in the roasting pan. This allows the chicken’s natural juices to flow downwards, basting the breast meat as it cooks. Make sure there is enough space around the chicken in the pan to ensure proper air circulation and even cooking.
Cooking temperature and times
Determining the ideal cooking temperature and times is crucial to ensure a perfectly cooked chicken. Achieving the right internal temperature and calculating the cooking time are key aspects of this process.
Determining the internal temperature
The internal temperature of the chicken is the most accurate way to determine its doneness. Use a meat thermometer to take the temperature in the thickest part of the thigh, without touching the bone. The chicken is safe to eat when it reaches a minimum internal temperature of 165°F (74°C). This ensures that the meat is fully cooked and safe to consume.
Calculating the cooking time
The cooking time of a roasted chicken depends on its size and the oven temperature. As a general rule, roast the chicken for 20 minutes per pound at 350°F (175°C). However, it’s important to refer to a reliable recipe or cooking chart to get precise cooking times for your specific chicken size and desired degree of doneness.
Basting the chicken
Basting involves periodically spooning the pan drippings or a homemade basting sauce over the chicken while it roasts. This helps to keep the meat moist and adds extra flavor. Baste the chicken every 30 minutes or so, being careful not to continually open the oven door as it will result in a longer cooking time.
Using a meat thermometer
To ensure accuracy, use a reliable meat thermometer throughout the cooking process. Insert the thermometer into the thickest part of the thigh, away from the bone, to check the internal temperature. This will give you an accurate reading and prevent overcooking or undercooking the chicken.
Proper roasting technique
To achieve a perfectly roasted chicken with moist and tender meat, follow these essential techniques.
Starting with high heat
To jumpstart the browning process and crisp up the skin, begin roasting the chicken at a high temperature. Start with 450°F (232°C) for the first 15-20 minutes, and then reduce the heat to the desired temperature for the remainder of the cooking time.
Lowering the temperature
After the initial high heat, reduce the oven temperature to 350°F (175°C) or the recommended temperature for your recipe. This lower heat allows the chicken to cook evenly and thoroughly without burning or drying out.
Rotating the chicken
To ensure even browning and cooking, rotate the chicken halfway through the cooking time. This helps to distribute the heat evenly, resulting in a more uniform and delicious roast. Use oven mitts or tongs to carefully rotate the chicken in the roasting pan.
Allowing resting time
Once the chicken has reached the desired internal temperature, it’s important to let it rest before carving. Resting allows the juices to redistribute throughout the meat, resulting in a more flavorful and juicy roast. Tent the chicken loosely with foil and let it rest for approximately 15 minutes before carving and serving.
Checking for doneness
Knowing when your roasted chicken is perfectly cooked is essential to avoid undercooking or overcooking. Here are some ways to determine if your chicken is done.
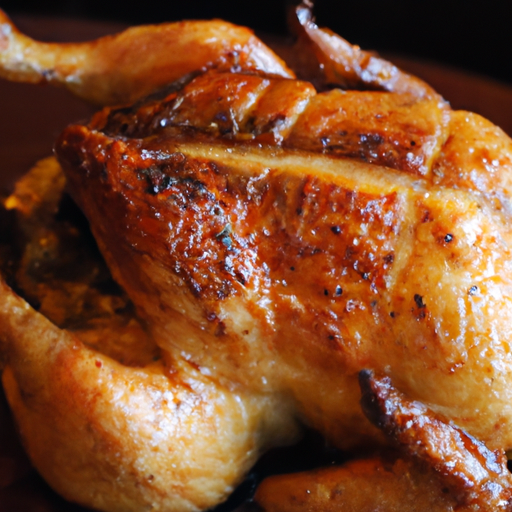
Visual cues
Visual cues can give you a good indication of the chicken’s doneness. The skin should be golden brown and crispy, and the meat should be opaque and no longer pink. Use a meat thermometer to double-check the internal temperature for accuracy.
Using a meat thermometer
Using a meat thermometer is the most reliable method to ensure your chicken is fully cooked and safe to eat. Insert the thermometer into the thickest part of the thigh, away from the bone. The temperature should read 165°F (74°C) to guarantee that your chicken is cooked to perfection.
Juices should run clear
Another sign of a properly cooked chicken is when the juices run clear when the meat is pierced. If the juices are pink or have a slight hint of red, the chicken needs more time in the oven. Clear juices indicate that the meat is thoroughly cooked and ready to be enjoyed.
Testing the thigh meat
The meat around the thigh is often the last part to fully cook. To ensure it’s done, make a small incision into the thigh, near the bone. If the meat is no longer pink and the juices run clear, the chicken is ready. If not, return it to the oven and continue roasting until it reaches the desired doneness.
Letting the chicken rest
Allowing the chicken to rest after roasting is a crucial step that should not be skipped. This resting time is essential for a moist and tender final result.
Covering with foil
Once the chicken has finished roasting, tent it loosely with aluminum foil. This helps to retain the heat and keeps the chicken warm while it rests. Avoid tightly sealing the foil, as this can trap steam and result in soggy skin.
Resting time based on size
The resting time after roasting will vary depending on the size of the chicken. As a general rule, smaller chickens should rest for 10-15 minutes, while larger chickens may need 15-20 minutes. This allows the juices to redistribute throughout the meat, resulting in a more succulent and flavorful roast.
Retaining juices
Resting the chicken allows the juices to redistribute and be absorbed back into the meat. This not only enhances the flavor but also helps to retain the moisture, resulting in a juicier and more tender roast. Skipping or rushing the resting time can lead to a drier and less enjoyable eating experience.
Enhancing tenderness
Resting also helps to relax the meat fibers, making the roasted chicken more tender and easier to carve. The meat will be less likely to shred or tear when sliced, resulting in visually appealing and well-presented servings.
Serving and storing
Once your perfectly roasted chicken is ready, it’s time to serve and enjoy. Here are some tips for presenting and storing your roast chicken.
Carving the chicken
To carve the chicken, place it on a carving board or a large plate. Start by removing the twine, if used, and then separate the thighs and drumsticks from the breast. Carefully slice the breast meat against the grain into thin slices. Serve the chicken pieces on a platter, garnished with fresh herbs for an extra touch of elegance.
Presentation tips
When presenting your roast chicken, consider garnishing it with fresh herbs, such as parsley or rosemary sprigs, to add a pop of color. Arrange the chicken beautifully on a serving platter, and serve it alongside your favorite side dishes, such as roasted vegetables, mashed potatoes, or a crisp salad.
Storing leftovers
If you have any leftovers, it’s important to store them properly to maintain their quality and safety. Remove the meat from the bones and place it in an airtight container. Refrigerate the leftovers within two hours of cooking and consume them within three to four days.
Reheating the chicken
To reheat leftover roasted chicken, preheat the oven to 350°F (175°C). Place the chicken pieces in a baking dish and cover them with foil to prevent drying. Heat until warmed through, usually around 20 minutes. You can also use a microwave, but be cautious as the chicken may become dry if overheated.
Variations and additional tips
While a classic roasted chicken is delicious on its own, there are variations and additional tips to take your roast to the next level.
Crispy skin variation
If you love crispy skin, try giving your roasted chicken a quick broil at the end of the cooking time. Increase the oven temperature to broil and place the chicken under the broiler for a few minutes, keeping a close eye on it to avoid burning. This will result in a beautifully golden and extra crispy skin.
Beer can chicken
For a fun twist on traditional roasting, consider trying beer can chicken. This involves placing an open can of beer inside the chicken cavity and roasting it in an upright position. The beer adds moisture and flavor to the chicken while helping to keep it tender and juicy.
Stuffing the chicken
To add even more flavor to your roast, consider stuffing the chicken with your favorite ingredients. Whether it’s a traditional bread stuffing, a flavorful rice mixture, or a combination of herbs and vegetables, stuffing the chicken adds both taste and visual appeal to your roast.
Adding vegetables
Roasting vegetables alongside your chicken not only saves time but also allows them to absorb the flavorful drippings from the chicken. Potatoes, carrots, onions, and Brussels sprouts are all great options. Simply toss the vegetables in olive oil, season them with salt and pepper, and place them around the chicken in the roasting pan. The result is a complete and delicious one-pan meal.
With these comprehensive tips and techniques, you are now equipped to roast a chicken to perfection. Remember to select the right chicken, properly prepare it, season it to your liking, and follow the cooking and resting times. Get creative with variations and enjoy the mouthwatering results of a beautifully roasted chicken.